

Top
Author
Published
14 Sep 2023Form Number
LP1810PDF size
13 pages, 1.3 MBSubscribed to LP1810.
Thank you for your feedback.
Abstract
The Intel Xeon CPU Max Series integrates Intel Xeon Scalable processors with high bandwidth memory (HBM) and is architected to increase memory bandwidth for applications in data-intensive workloads. Lenovo servers such as the ThinkSystem SD650 V3 support the Intel Xeon CPU Max Series and address the customer needs that require the extreme data bandwidth for applications in data-intensive workloads.
In this paper, we explain the Intel Xeon CPU Max Series processors from the architecture perspective, and introduce the three CPU memory modes configuration from both hardware and software views. We then demonstrate how to set up and use HBM Flat Memory mode on the SD650 V3 server.
This paper is intended for customers and technical sales interested in the Intel HBM architecture and Flat Memory Mode configuration on Linux on the Lenovo ThinkSystem servers.
Introduction
The Intel Xeon CPU Max Series integrates Intel Xeon Scalable processors with high bandwidth memory (HBM) and is architected to increase memory bandwidth for applications in data-intensive workloads, such as modeling, artificial intelligence, deep learning, high performance computing (HPC) and data analytics.
It integrates 64 GB of high bandwidth in-package memory (HBM) in the CPU package, as well as other I/O functionalities such as PCI Express 5.0 and CXL 1.1 etc. Xeon Max CPUs provide memory (HBM) capacity for the CPU cores in packages, to fit most common HPC workloads.
More details about the benefits of Intel Xeon CPU Max Series can be found at:
https://www.intel.com/content/www/us/en/products/docs/processors/xeon/xeon-max-series-product-brief.html
Architecture
In this section, we introduce the architecture of the Intel Xeon CPU Max Series and the CPU configuration from the hardware and software perspective.
The processor contains four HBM2e stacks with a total high bandwidth memory (HBM) capacity of 64 GB per processor package, in addition to eight DDR memory channels, as shown in the following figure.
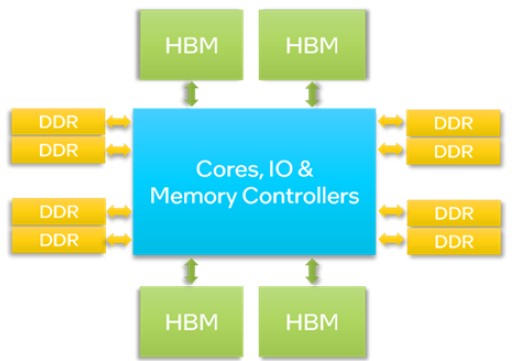
Figure 1. CPU block diagram of the Intel Xeon CPU Max Series
For a two-socket system, the two processors are connected by up to four Intel Ultra Path Interconnect (Intel UPI) links in the system. A two-socket system has a total of 128 GB of HBM capacity.
CPU memory modes configuration: Hardware view
This section describes each configurable CPU memory mode from a hardware point of view.
Depending on the DDR memory DIMMs population, the hardware configuration in the UEFI and software setup in OS, there are three HBM Memory Modes (HBM-only, Flat_1LM and Cache_2LM, see the Software view section for a detailed explanation) that can be configured, as shown in the following figure.
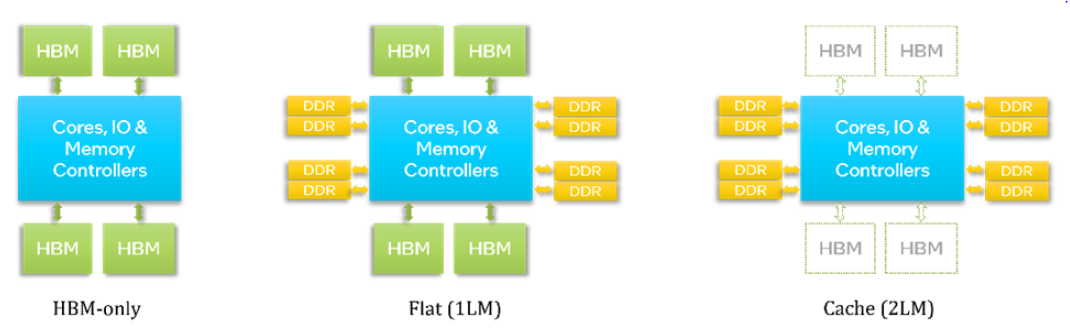
Figure 2. HBM Memory Modes
There is another Xeon Max CPU configuration option SNC (Sub NUMA Cluster) in the UEFI which will change the NUMA node partitions from the OS perspective: when the SNC is disabled, each processor package acts as a single NUMA node (as with any ordinary processor); when SNC is enabled, each processor package in the system is partitioned into 4 sub-NUMA nodes, as shown in the figure below.

Figure 3. Sub NUMA Cluster modes (left: disabled; right: enabled)
In our test setup, we will disable SNC in the UEFI to simplify the setup, configuration and verification.
CPU memory modes configuration: Software view
From the software perspective, the processor exposes HBM to software (OS and applications) using three memory modes.
- HBM-only mode
When no DDR is installed, HBM-only mode is automatically selected. The only memory available to the OS and applications in this mode is HBM. The OS may see all the installed HBM in this mode, while applications will see what the OS exposes. Hence the OS and the applications can readily utilize HBM. However, the OS, background services, and applications must share the available HBM capacity (64GB per processor).
- Cache or 2-Level Memory (2LM) mode
When DDR is installed, it is possible to use HBM as a memory side cache for DDR by setting Memory Hierarchy to Cache mode in the UEFI setup menu before booting to OS. In this mode, only DDR address space is visible to software and HBM functions as a transparent memory-side cache for DDR. Therefore, applications in the OS do not need modifications to use the cache mode. In this mode, the HBM acts a transparent cache and is transparent to the OS.
- Flat or 1-Level Memory (1LM) mode
When DDR memory is installed, it is possible to expose both HBM and DDR to software by setting Memory Hierarchy to Flat mode in the UEFI setup menu before booting to OS. HBM and DDR are exposed to software as separate address spaces in this mode. DDR is exposed as a separate address space (NUMA node) and HBM as another address space (NUMA node). Users need to use NUMA-aware tools ( e.g., numactl ) or libraries to utilize HBM in this mode. Additional OS configuration is necessary before HBM can be accessed as part of the regular memory pool.
HBM support on Lenovo ThinkSystem servers
Intel HBM CPUs are supported on the following Lenovo ThinkSystem servers:
- ThinkSystem SD650 V3
- ThinkSystem SD650-I V3 (only supports Cache mode)
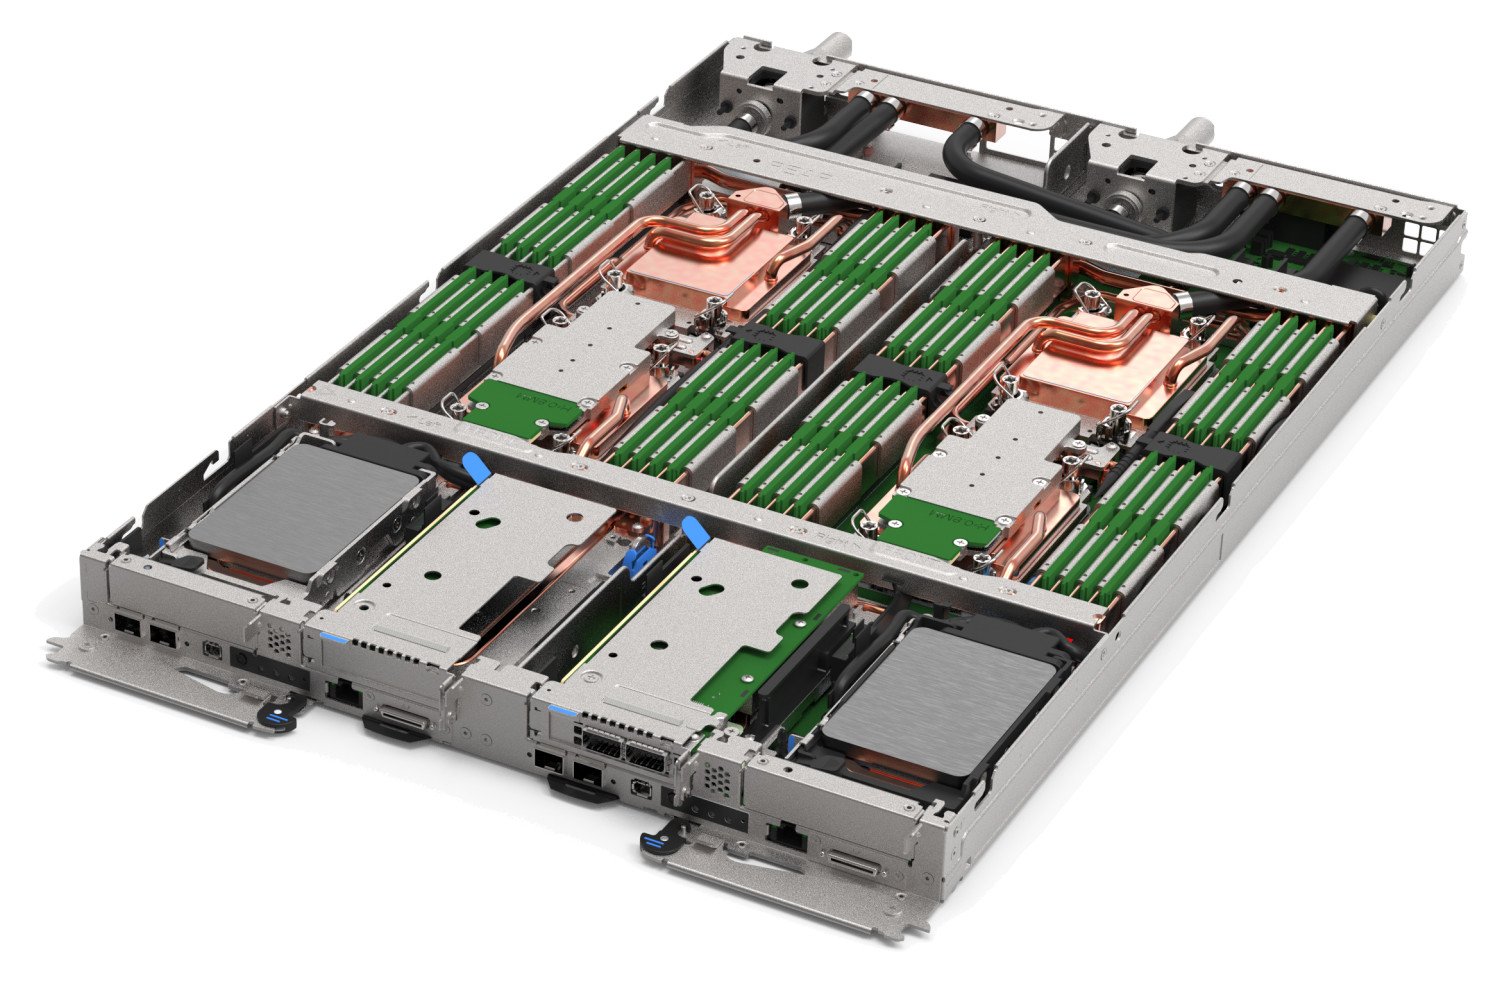
Figure 4. ThinkSystem SD650 V3 server tray with two distinct two-socket nodes
Configuring UEFI to enable HBM in Flat Memory mode
In this section, we will demonstrate how to set up and use HBM Flat memory mode on a Lenovo ThinkSystem SD650 V3 server with Intel Xeon CPU Max series processors.
In this test setup, two Xeon Max CPUs are installed in a two-socket node, providing a total of 128 GB of HBM capacity for the node, and the SD650 V3 server tray hosting the Xeon Max CPUs node is installed in a DW612S enclosure, as shown in the following figure.
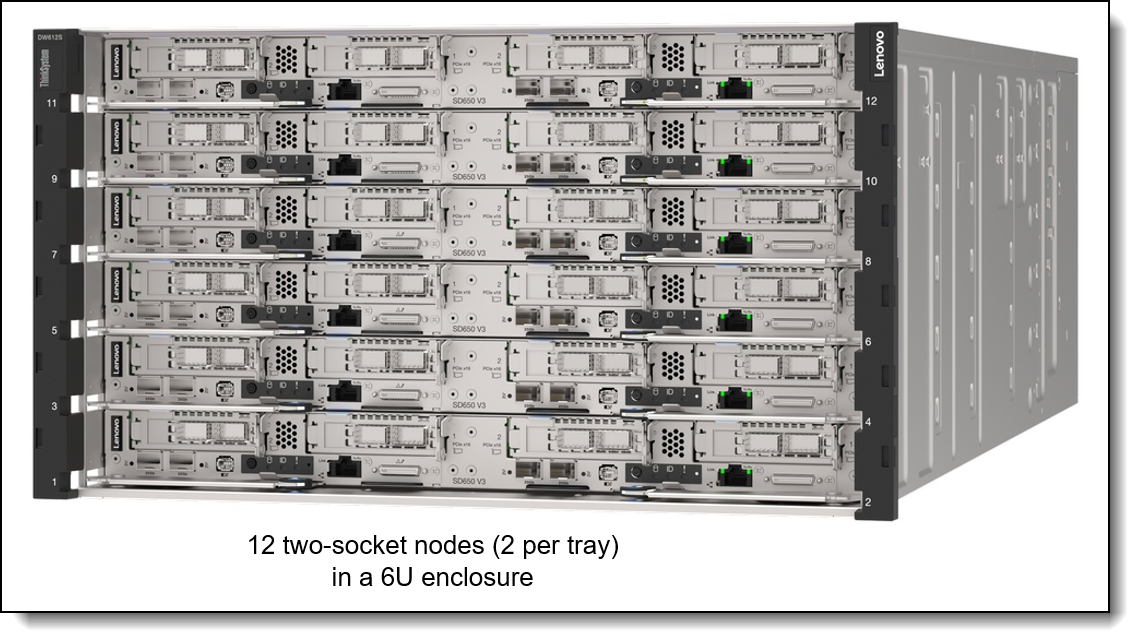
Figure 5. The DW612S enclosure with six trays of SD650 V3 servers (each tray is two nodes)
The following Linux operating systems are the minimum OS versions supported on the ThinkSystem SD650 V3 that also support HBM Flat Memory (1LM) mode:
- Red Hat Enterprise Linux 9.0 or later
- SUSE Linux Enterprise Server 15 SP4 or later
- Ubuntu 22.04 or later
The steps to configure the server UEFI to enable HBM in Flat Memory Mode are as follows.
- When prompted during server UEFI boot, press F1 to enter System Setup
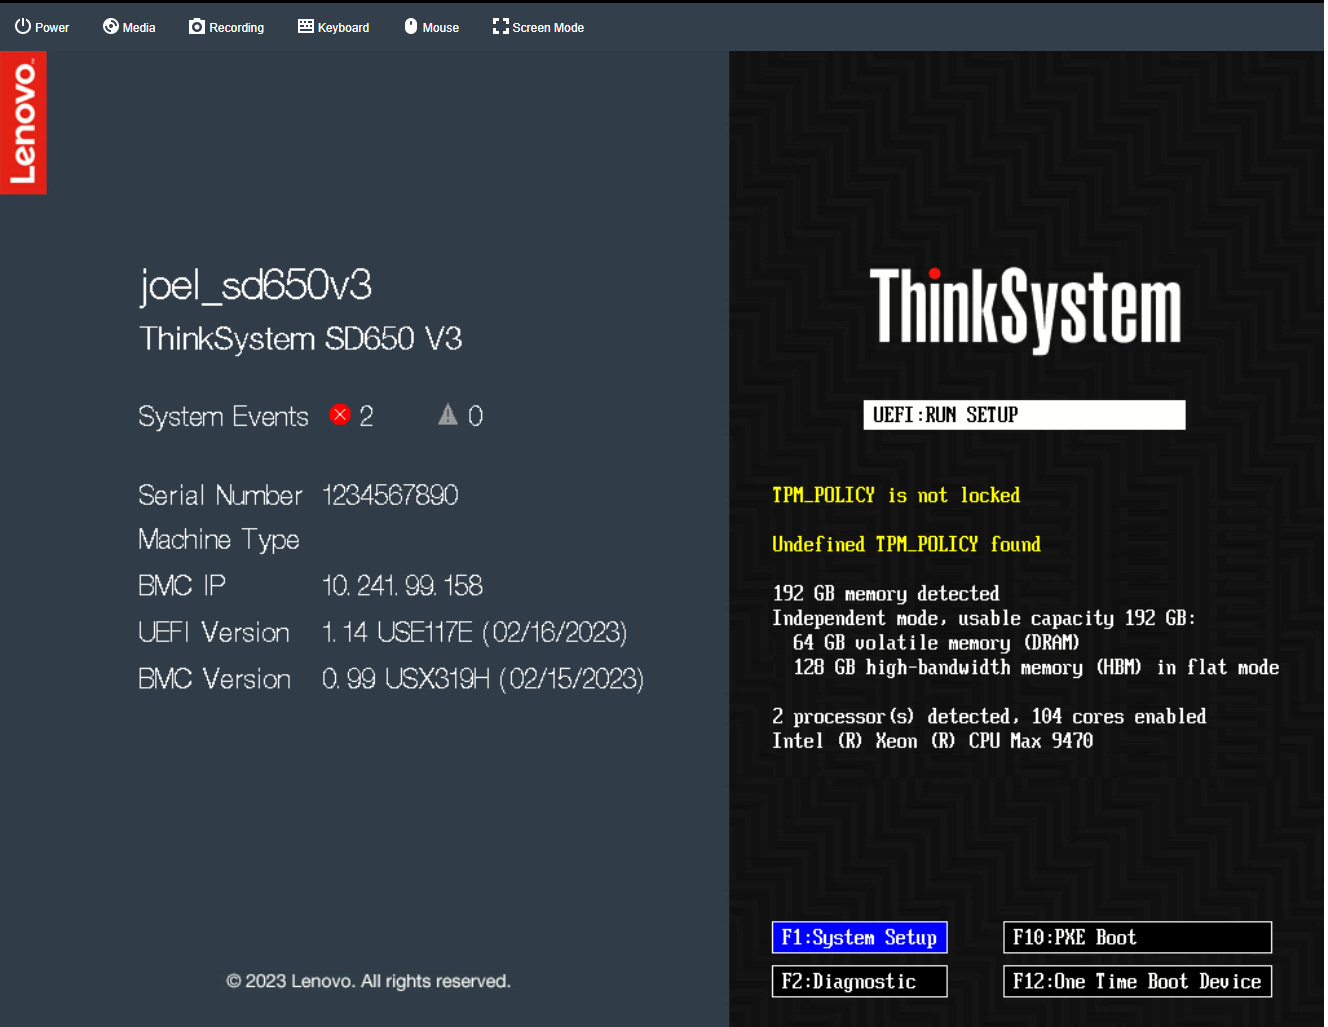
Figure 6. UEFI screen and F1:System SetupNote that, as you can see from the right side of the UEFI screen, 64 GB DRAM and 128 GB HBM are installed on the system.
- Select System Settings > Memory > Memory Hierarchy. The following figure is displayed.
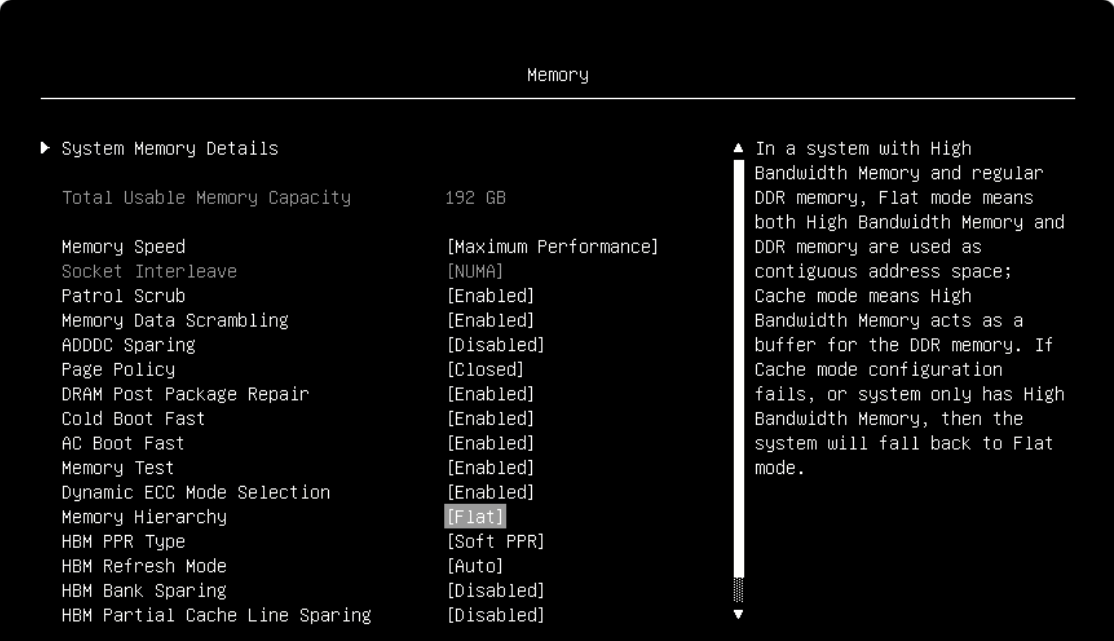
Figure 7. Memory Hierarchy setup - Press Enter to select Flat if it isn’t already.
- Use ESC key to go back to the beginning of UEFI setup and Select System Settings > Processors > SNC
- Press Enter to select Disabled if it isn’t already, as shown in the figure below.
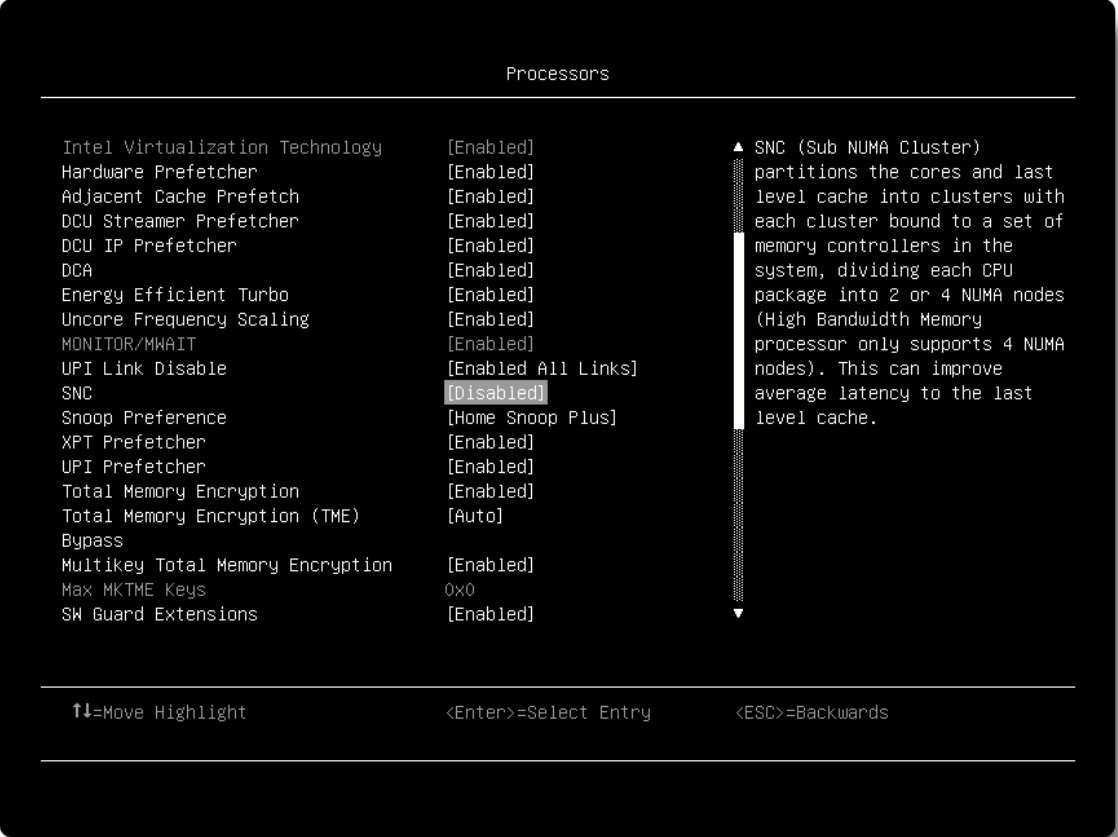
Figure 8. SNC setup - Save the settings and reboot the system.
At this point, you can start to install RHEL 9.1. Just follow the standard RHEL 9.x OS installation process to complete the OS installation. For more details, refer to:
https://access.redhat.com/documentation/en-us/red_hat_enterprise_linux/9/html/performing_a_standard_rhel_9_installation/index
Exposing HBM in Flat Memory Mode in the Linux OS
After the RHEL 9.1 OS installation, boot the OS, and do the following to enable HBM in the OS:
- Check the total available memory and the NUMA nodes
Use the following command to check the total memory available to the OS:
freeOutput is shown below:

Figure 9. free memory before configuration in OSAs can be seen, the total available memory size under OS is around 64GB, which is the total DDR DRAM memory size, excluding HBM capacity.
Use the following command to check whether the HBM NUMA nodes are visible:
numactl -H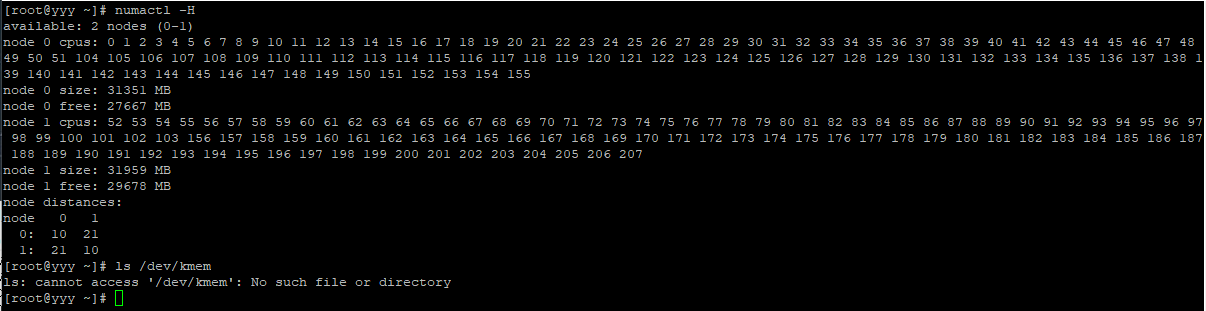
Figure 10. NUMA nodes before configuration in OSAt this moment, the HBM NUMA nodes are not visible either.
Note that, after selecting Flat as the Memory Hierarchy in UEFI (Figure 7) and booting to the OS, the system boots up with only DDR exposed to the OS and applications. The HBM is still not visible in the default memory pool since HBM is marked as special-purpose memory. This design choice was made to prevent the OS from allocating and reserving valuable HBM memory during the OS boot process. Since the HBM is "hidden" from the OS during the boot process, the OS cannot allocate or reserve HBM memory.
So, the above outputs are expected results, as we have not yet installed the necessary software packages in the OS, nor have we done the necessary configuration.
- Install the necessary software packages in the OS with the following commands:
dnf install daxctl ndctlOutput is shown below.

Figure 11. Software packages installed in OS - Execute the configuration commands
The above instructions only describe how to install the necessary software packages in the OS. To enable the "hidden" HBM to appear in the OS, additional configuration is required with the following commands (one command for one HBM NUMA node, thus we need two commands for a two-socket system):
daxctl reconfigure-device -m system-ram dax0.0
daxctl reconfigure-device -m system-ram dax1.0
The above two commands reconfigured dax devices dax0.0 and dax1.0 to the system RAM mode, which converted dax devices to be regular system memory in hot−pluggable system RAM mode. Each dax device needs to be reconfigured so that OS can see its associated memory.
For more details about the daxctl command utility usage, please refer to the document below:
https://docs.pmem.io/ndctl-user-guide/daxctl-man-pages/daxctl-reconfigure-device - If SNC mode was enabled in the Processor page in UEFI (Figure 8), further configuration is required, since each processor package in the system is partitioned into 4 sub-NUMA nodes (as described in the Architecture section), so total 8 sub-NUMA nodes in a two-socket system need to be reconfigured:
daxctl reconfigure-device -m system-ram dax2.0
daxctl reconfigure-device -m system-ram dax3.0
daxctl reconfigure-device -m system-ram dax4.0
daxctl reconfigure-device -m system-ram dax5.0
daxctl reconfigure-device -m system-ram dax6.0
daxctl reconfigure-device -m system-ram dax7.0
Verifying the results
Perform the following steps to verify HBM is visible to the OS.
- Verify the total memory
Use the free command to check the total available memory for OS. Below is the command output.
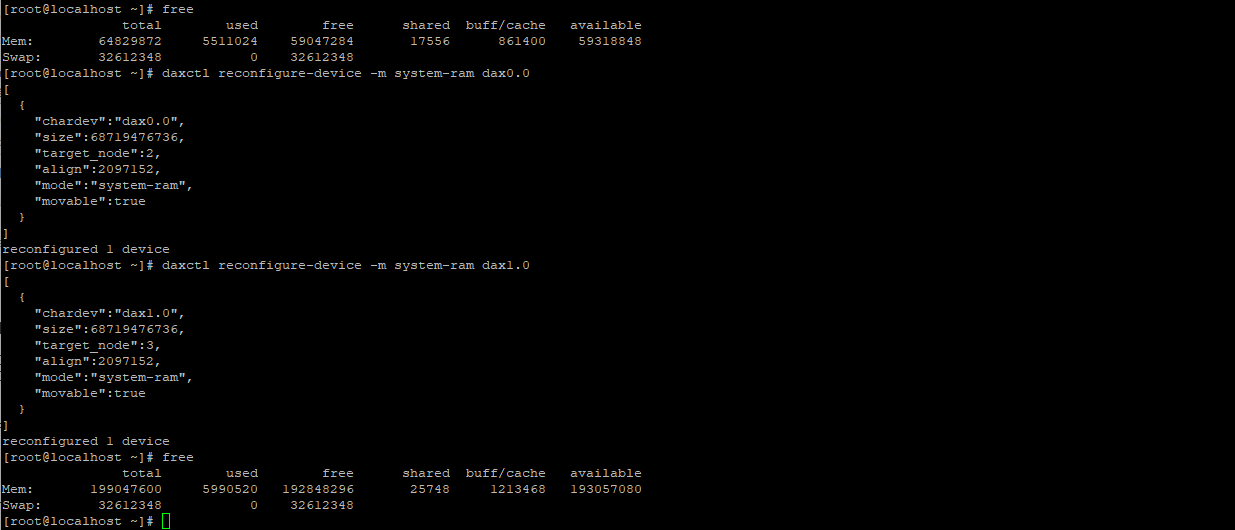
Figure 12. free memory after configuration in OSAs can be seen from figure 12, additional 128 GB (from HBM capacity) was added to the original 64 GB DRAM capacity and the total memory added up to around 192 GB.
- Verify the NUMA nodes
Use the following command to verify that the HBM nodes:
numactl -HThe entire HBM capacity are visible, as below figure shows (for the UEFI SNC disabled case).
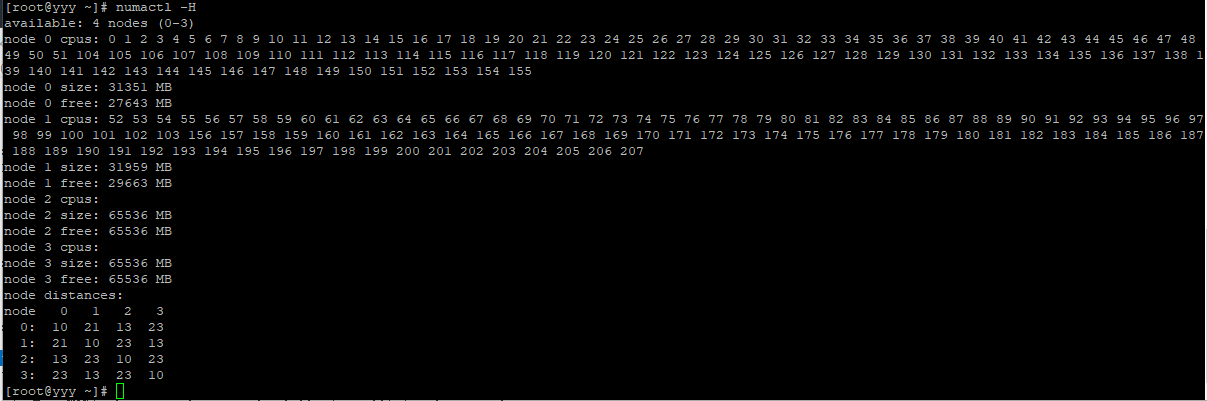
Figure 13. NUMA nodes after configuration in OSTwo more HBM NUMA nodes were just being added. The total number of available NUMA nodes grew from 2 (Figure 10) to 4 (Figure 13) after configuration.
- The daxctl configuration steps described in step 3 in Exposing HBM in Flat Memory Mode in the Linux OS need to be carried out each time the system boots.
Therefore, it would be convenient to put the above configuration commands in a script file and enable a systemd service file to execute it each time after the OS boots, as follows:
- Create the hbm_startup.sh script file with contents shown below and place it in /usr/local/bin
#!/usr/bin/bash ######################################################## # hbm_startup.sh # This program should be placed in /usr/local/bin ######################################################## # # # Configure the HBM memory daxctl reconfigure-device -m system-ram dax0.0 daxctl reconfigure-device -m system-ram dax1.0 # Unmark below commands to make them effective if SNC mode was enabled in the Processor page in UEFI # daxctl reconfigure-device -m system-ram dax2.0 # daxctl reconfigure-device -m system-ram dax3.0 # daxctl reconfigure-device -m system-ram dax4.0 # daxctl reconfigure-device -m system-ram dax5.0 # daxctl reconfigure-device -m system-ram dax6.0 # daxctl reconfigure-device -m system-ram dax7.0 - Create a systemd service file: /etc/systemd/system/hbm_startup.service and add the contents shown below:
######################################################## # hbm_startup.service # This program should be placed in /etc/systemd/system ######################################################## # # [Unit] Description=runs /usr/local/bin/hbm_startup.sh [Service] ExecStart=/usr/local/bin/hbm_startupp.sh [Install] WantedBy=multi-user.target - Enable the service with below command so that the hbm_startup.sh script will get started to configure HBM each time after the OS boots.
systemctl enable hbm_startup.service
- Create the hbm_startup.sh script file with contents shown below and place it in /usr/local/bin
The above test setup demonstrated the HBM Flat memory mode enabling and using the Intel Xeon CPU Max Series processors and SD650 V3 server.
More information
For more details about the configuration and tuning of the Intel Xeon CPU Max Series processors, refer to:
Intel Xeon CPU Max Series Configuration and Tuning Guide
https://www.intel.com/content/www/us/en/content-details/769060/intel-xeon-cpu-max-series-configuration-and-tuning-guide.html?DocID=769060
For a discussion on the performance of HBM memory in the Intel Xeon Max Series processors compared to DDR5 memory in 4th Gen Intel Xeon Scalable processors, refer to the following document:
Implementing High Bandwidth Memory and Intel Xeon Processors Max Series on Lenovo ThinkSystem Servers
https://lenovopress.lenovo.com/lp1738-implementing-intel-high-bandwidth-memory
For more details about the Lenovo ThinkSystem SD650 V3 Neptune DWC Server, refer to:
Product Guide - Lenovo ThinkSystem SD650 V3 Neptune DWC Server
https://lenovopress.lenovo.com/lp1603-thinksystem-sd650-v3-server
Author
Kelvin Shieh is the OS Development Technical Lead for the Lenovo Infrastructure Solutions Group, based in Taipei, Taiwan.
Related product families
Product families related to this document are the following:
Trademarks
Lenovo and the Lenovo logo are trademarks or registered trademarks of Lenovo in the United States, other countries, or both. A current list of Lenovo trademarks is available on the Web at https://www.lenovo.com/us/en/legal/copytrade/.
The following terms are trademarks of Lenovo in the United States, other countries, or both:
Lenovo®
ThinkSystem®
The following terms are trademarks of other companies:
Intel® and Xeon® are trademarks of Intel Corporation or its subsidiaries.
Linux® is the trademark of Linus Torvalds in the U.S. and other countries.
Other company, product, or service names may be trademarks or service marks of others.
Configure and Buy
Please select a locale


